Getting started with ABB
This guide will show you how to get started using AdaOne with your ABB robot cell. AdaOne supports all ABB robots that are programmed in RAPID language, including IRC5 and OmniCore controllers. The following sections walk you through configuring your robot cell, creating a post processor, transferring programs to the controller, and running them.
Setting up your robot cell
Follow the Create a robot cell guide to set up your robot cell in AdaOne. In most cases, the robot controller will already have definitions for the tool and the work frame. Follow the instructions below to retrieve this data from the teach pendant and add it to your process head and work frame in AdaOne.
Retrieving tooldata
The tool frame (TCP) of the process head in AdaOne must match the tooldata defined on the robot controller. Follow these steps to retrieve the tooldata from the ABB teach pendant:
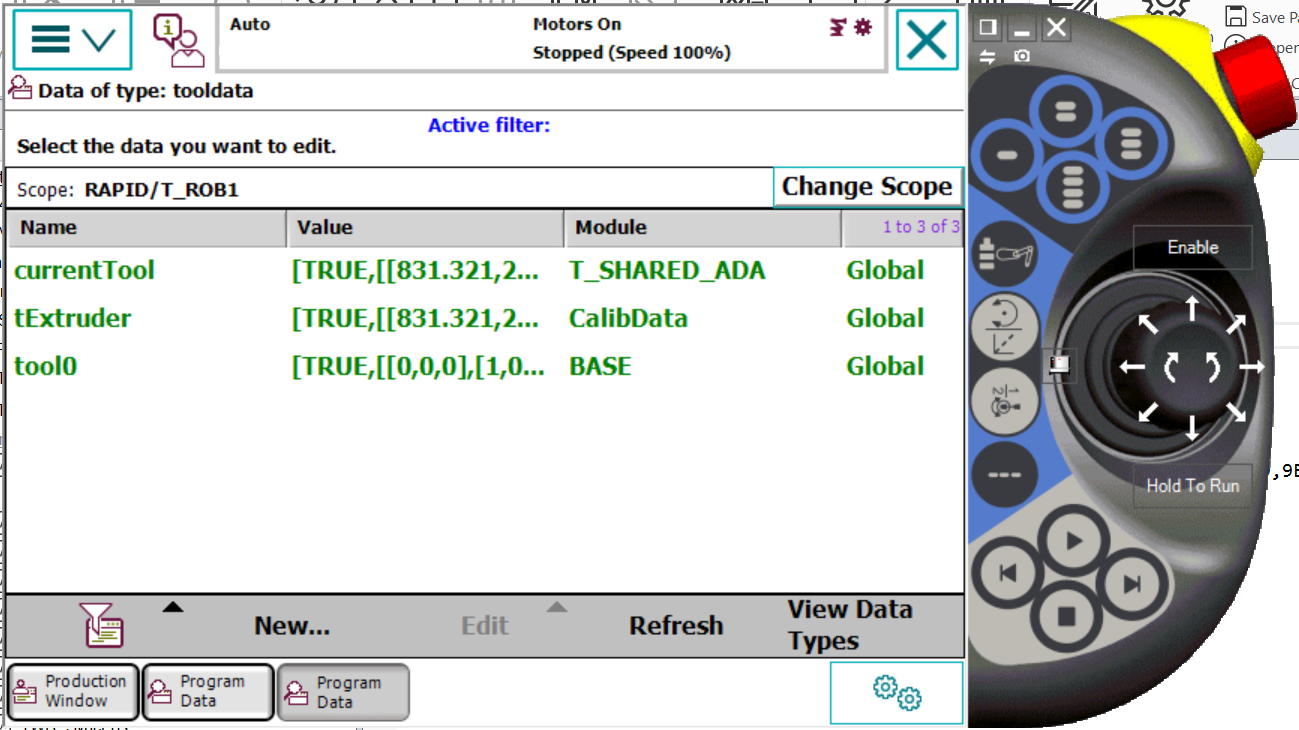
- On the teach pendant, tap Main Menu → Program Data.
- Select tooldata from the list and double-tap it.
- You will see all defined tool variables. Select the tool you want to use.
- Note down the X, Y, and Z translation values as well as the quaternion orientation values (q1–q4).
Back in AdaOne:
- Select your process head in the cell view and open the settings panel on the right-hand side.
- Set the tool ID to match the name of the tool variable on the controller (e.g.
tExtruder). - Enter the X, Y, and Z values from the teach pendant into the position fields.
- Enter the orientation values into the rotation fields. Change the input type to quaternion and enter the q1–q4 values directly.
- Make sure the Tool convention (Z+ or Z−) matches the direction of your tool. Z+ means the tool points in the positive Z direction of the tool frame, while Z− means it points in the negative Z direction. This will affect the direction of motion instructions and how the robot orients itself during printing.
If the Override tool frame option is enabled on the post processor, AdaOne will include the tool definition directly in the exported RAPID program as a tooldata variable. This means the controller will use the values from AdaOne rather than its own stored tool definition.
Retrieving workobject data
The work frame in AdaOne must match the wobjdata (work object) defined on the robot controller. Follow these steps to retrieve the workobject data from the ABB teach pendant:
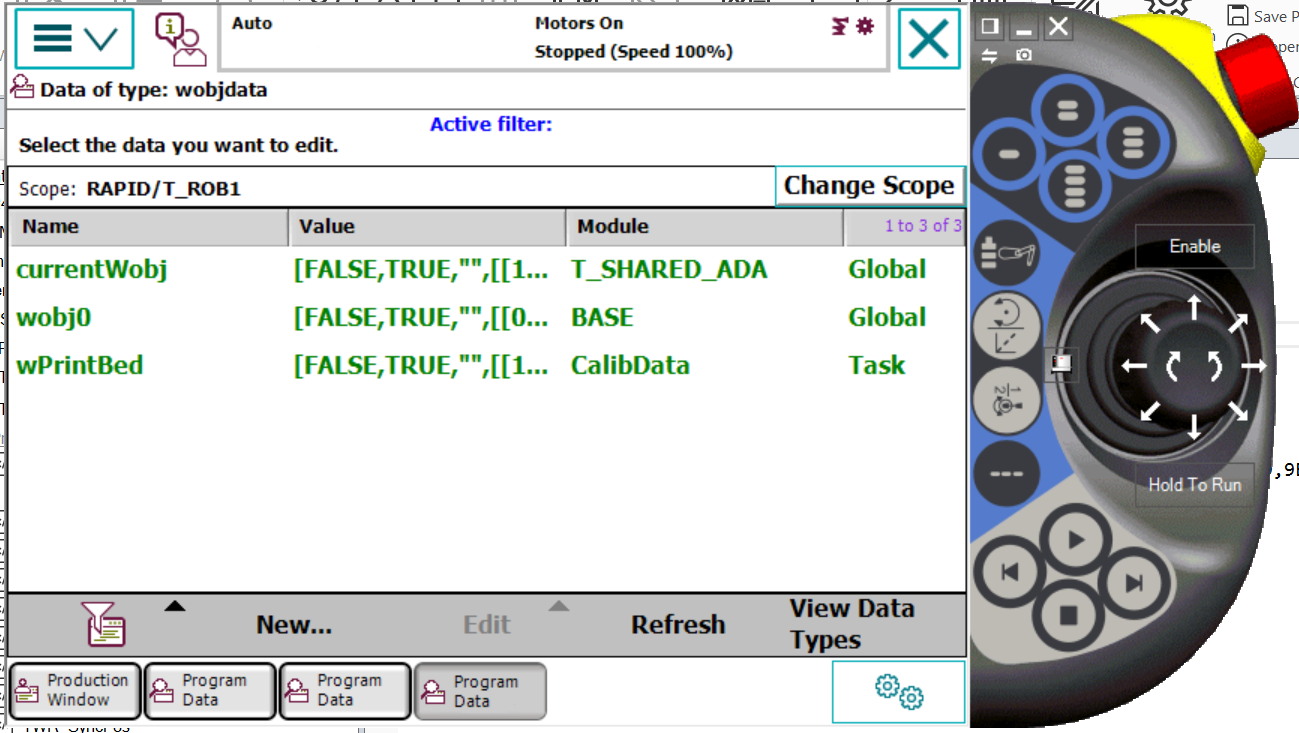
- On the teach pendant, tap Main Menu → Program Data.
- Select wobjdata from the list and double-tap it.
- You will see all defined work object variables. Select the work object you want to use.
- Note down the user frame translation (X, Y, Z) and orientation values.
Back in AdaOne:
- Go to the cell view and select your work frame (or add a new one via + → Add Work Frame).
- Set the work frame ID to match the name of the work object variable on the controller (e.g.
wPrintBed). - Enter the translation values from the teach pendant into the Position fields of the work frame.
- Enter the orientation values into the Rotation fields, converting from quaternions to Euler angles if needed.
If the Override work frame option is enabled on the post processor, AdaOne will export the work frame as a wobjdata variable in the RAPID program. The name of the work object will match the identifier of the work frame in AdaOne.
Creating a post processor
AdaOne provides several post processor options for ABB robots. The post processor converts the planned tool path into RAPID code that the robot controller can execute.
| Post processor | Output format | Best for |
|---|---|---|
| ABB RAPID | Native RAPID (.mod) | General-purpose additive manufacturing |
| ABB RAPID Arc Welding | RAPID with ArcL/ArcC | Wire Arc Additive Manufacturing (WAAM) |
| AdaPack for ABB | CSV data files | Large-format printing with no program size limitations |
There are also other options for ABB, including the ABB 3DP PowerPack.
Configuring the post processor
- Go to Main menu → Libraries → Post Processors and create a new post processor (or edit an existing one).
- Select the appropriate format preset — for example, ABB RAPID or ABB RAPID Arc Welding.
- Configure the post processor settings to match your setup.
- It is possible to customize the post processor using the built-in events system. This allows injecting custom RAPID code at different points in a program, for example at layer start/end and process on/off. For more information, see the post processor documentation.
Transferring a program
Once a program has been generated and exported from AdaOne, it needs to be transferred to the ABB robot controller. There are two ways to do this: using a USB drive, or transferring directly from AdaOne over the network.
Transfer with a USB drive
- Export the program from AdaOne. The output will be a single .mod file or a folder containing one or more
.modfiles and optionally a.pgfprogram file. - Copy the exported file / folder to a USB drive.
- Insert the USB drive into the ABB robot controller (IRC5 or OmniCore).
- Copy the folder from the USB drive to the HOME folder on the robot controller using the file management interface on the teach pendant. By default, programs are loaded from the "HOME" directory on the controller, but you can choose a different location in the post processor settings if desired.
- On the teach pendant, tap ABB → Program Editor.
- Tap Tasks and Programs at the top of the screen.
- Tap Show Modules at the bottom.
- Tap File → Load Module… and confirm losing the program pointer if prompted.
- Navigate to the program folder, select the main
.modfile, and tap OK.
Transfer with AdaOne
AdaOne supports direct program transfer to ABB robots over the network. This requires a network connection between the computer running AdaOne and the robot controller.
- Open your robot cell in AdaOne and click the Connect button in the top right corner.
- Enter the IP address of the robot controller and connect.
- Once connected, click the Connected button and select Transfer program.
- Select the program you want to transfer from the list and click Transfer. The program will be uploaded to the "AdaOne" folder on the robot controller.
- Click Load program to load the program on the controller. The robot must be in Auto mode and not currently running.
For more details, see the Transfer and run ABB robot programs documentation.
Running a program
After the program has been loaded on the controller, follow these steps to run it:
- Set the controller mode:
- For initial testing, switch the controller to Manual mode using the mode switch on the controller. The teach pendant should display "Manual" in the status bar.
- For production runs, switch to Auto mode.
-
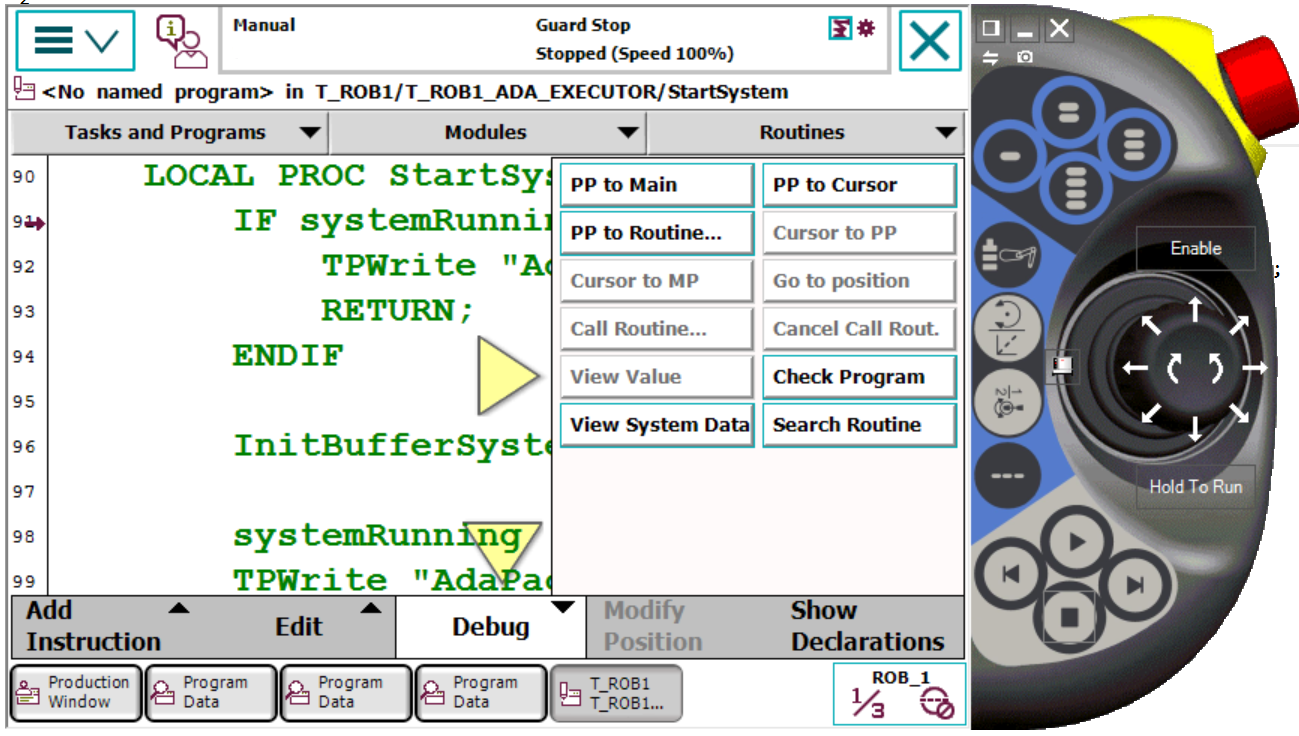
Set the program pointer:
- On the teach pendant, go to ABB → Program Editor → Debug → PP to Main (or PP to Routine if you want to start from a specific routine).
- Select the main routine of the program generated by AdaOne.
-
Start the program:
- In Manual mode: Hold the deadman switch on the teach pendant and press the Play button to start the program. The robot status should display "Motors On" and the robot's status light should turn on.
- In Auto mode: Press the Motors On button on the controller, then press the Play button on the teach pendant to start the program.
-
Monitor execution:
- If you are connected to the robot from AdaOne, you can use the Process control option in the Connected menu to monitor and control the program execution. RAPID variables and IOs for process control can be mapped in the robot controller settings in AdaOne.
Always perform a dry run at reduced speed in Manual mode before running at full speed in Auto mode. Make sure no personnel are inside the robot's work envelope during Auto mode operation.